Okra, Zinnias and Air Conditioning: the Best Things about August in South Carolina

I would state that of all the months of the year, August is probably one of my least favorite. Coronavirus pandemic aside, to me August brings forth the image of a fiery hot sun drenching the outside landscape, opening a door to the outside and being met with a wall of humidity that will almost suck the life right out of you. Hey, but I was born and raised in this environment so I must be ‘used to it’, right? Nope. I will never like the daily weather report for the 8 weeks between about mid-July and mid-September. So H-O-T. Temps in the high 90s… dropping (use that term very loosely) to 76-78 at night. With the humidity, a day that only hits 100 degrees is like a refreshing zephyr. So all you peeps complaining about your 85 degree heat-wave, cool your heels. Ahhh, I love air conditioning! 

Okay, so the weather is a boring topic but I promise I have a point. While the WEATHER in August stinks, there is an upside. One is that the Dog Days are almost over…okay, sorry. Seriously, August in the south equals two “BEST of” ingredients, in my opinion. One is okra and the other is the zinnia.

The Zinnia… so pretty.

Yes, zinnia is a flower and okra is a vegetable. But have you ever seen an okra plant in bloom? If you have, you know that okra plants have pretty yellow blossoms. I’ve never eaten an okra bloom, but I am hoping to someday soon. And zinnias are… guess what? Edible! Plus they are so very colorful – so many colors and easy to grow. AND they reseed themselves. So all the lazy gardeners out there – the zinnia may be your new favorite plant.

Free-wheeling zinnias make long-lasting cut flower arrangements and as I found add a bitter, yet pleasant twist to a mixed summer salad. Just wash the blooms lightly, dry and pluck off the petals. Toss on top of your salad. Unusual. Pretty. Tasty. 

Smokey, crispy OKRA! Yum.

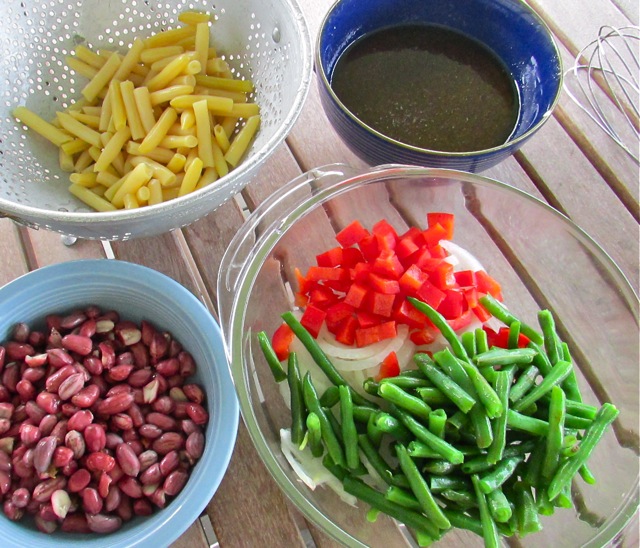
Now to the okra. I was pondering ways to use okra besides either frying or pickling – and I was planning to fire up my smoker so voilà – what about smoked okra? Add in a recent overhead conversation about fried okra and learning that their mother-in-law ‘fries” okra in the oven. Ding-ding-ding. Smoke the okra and ‘fry’ it in the oven … bet that would be good on a salad! Just how smoky will the okra get, I wondered? I am happy to report that mine was smoky. My only mistake in making the smoked okra was not making enough of it. They are so delicious to eat right out of hand – I could have eaten them all myself, but I didn’t. Self control, people. 

Place all ingredients for the Herb Buttermilk Dressing in a bowl… and mix. Voila!

Dipped straight into the homemade herbed, buttermilk dressing… maybe next time. So if it’s August and you’re going to smoke some ribs or fish or what have you, and have access to fresh okra – try the smoking and roasting method.

Smoked, Roasted Crispy Okra

Fresh okra on the smoker.
  • 10-12 medium to large okra (best if all about the same size)
  • Smoker (prepared with coals or electric) – smoker temp should be ‘medium’, NOT super-hot!
  • Woods chips (soak 1 hour and use in the smoker as per usual)
  • Olive Oil
  • 1 tsp salt
  • 1 tsp ground black pepper
  • ½ tsp garlic powder

Wash and dry okra. Place on top rack of smoker. In 30 minutes, use tongs to turn okra over and smoke another 30 minutes. Preheat oven to 450 degrees. In a small bowl mix the salt, pepper and garlic powder. Set aside. When okra are tender (they will shrink some and mine were ready after one hour in the smoker) remove from smoker and allow to cool. Split pods in half and toss with a good swish of olive oil (I did not measure, but maybe a tablespoon or so?) and sprinkle with about a ½ teaspoon of the salt/pepper mixture. 

Use a baking sheet (with sides) with parchment paper. Place okra in a single layer and roast for about 15 minutes. Shake the pan coupe of times to move the okra around so it cooks evenly. When it is crispy remove from oven.  Tends to soften after it sits so for crispiest okra use right away!

Herb Buttermilk Dressing

  • 1 cp. buttermilk, I used full fat
  • ½ cp. sour cream
  • ½ cp mayonnaise (Duke’s is ‘my’ brand- read here for my previous blog post)
  • ½ tsp garlic powder
  • ¼ tsp. onion powder
  • 1/4 tsp. dry mustard
  • 1 tsp. dried chives (or 2 tsp fresh minced)
  • 1 tbl. green onion tops (finely chopped)
  • 1 tsp. fresh dill (minced)
  • 2 tbl. fresh parsley (minced)
  • Juice of 1 medium lemon
  • ½ tsp salt (+ more to taste)
  • 1/2 tsp. ground white pepper

In a medium-sized bowl mix everything together well. Cover and refrigerate; wait at least one hour for flavors to meld before using. Adjust salt, if necessary. Will keep in refrigerator one week if well covered.  Makes 2 cups.
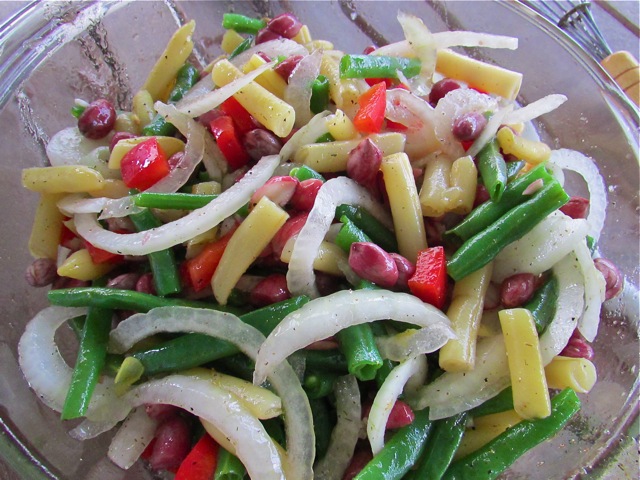
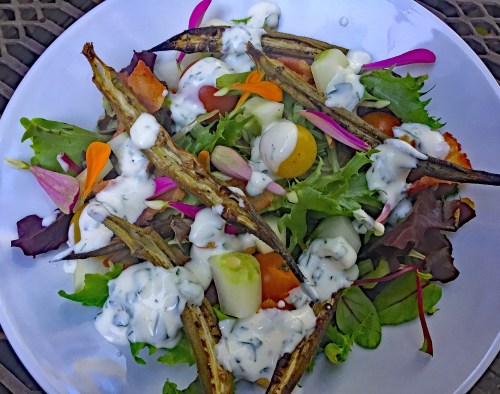
August Summer Salad

Salad – just need that Herb Buttermilk Dressing to finish it off!
  • Mixed salad greens of your choice
  • Small cherry tomatoes- washed, kept whole
  • Cucumber – washed, sliced or chopped
  • Bacon – crumbled
  • Smoked Okra
  • Zinnia flower petals
  • Herb Buttermilk dressing

Compose all ingredients but dressing in a large bowl or on individual plates. Drizzle with dressing. Serve immediately.

Ramblings: Straight to the heart with a reluctant southerner


2020 UPDATE: As I attempt to resuscitate southbyse.com back to life I wanted (needed?) to repost something until I can get a 100% certified-fresh post ready. Reviewing them, the current world situation seemed to at once be at odds with this post from 2012 and then again, maybe, just maybe, it is perfect. Or as perfectly imperfect as any of my posts can be.

I feel that many of the staid, old and ugly ways of thinking/feeling/acting are hopefully (finally!) being cast aside. Its been a hellava long time of waiting (and for many dying) for people of color. My neighbors, my co-workers and my friends deserve the boost and the love, and my white privilege (yes, I’m a middle-aged white woman) needs to be checked at the door. 

I hope by promoting southern culture, food and characters I don’t alienate anyone, but at the same time I will be writing from my experience and my point of view, which is well, southern. Hey, I’m a work in progress – just like this blog. Yes, we all change but my hope (and prayer) is that we EVOLVE. More kindness, more understanding, more openness, more learning, more appreciation and more forgiveness.

So here we go! Betsy


I’ve been thinking about writing a short post about Southern culture here on southbyse.com. But before I begin, let me state the obvious; that what is written in this is my take on some aspects of Southern culture. If you would like an academic breakdown, I refer you to the Encyclopedia of Southern Culture or the multi-volumes of The New Encyclopedia of Southern Culture, all published by The University of NC Press. Another great resource is The Southern Foodways Alliance.

Personally I am happy about the recent surge in popularity of Southernism. Sure enough it seems to be fashionable now to cook Southern, write Southern and dare I say, talk and sound Southern. In the past, I think many Southerners, myself included, would often hide our upbringing especially under professional circumstances, specifically among “mixed company”, i.e. northerners, mid-westerners, Californians and the like.

It’s something I call the ‘reluctant Southerner” syndrome. While I adore most of what the South has to offer – food, art, music, architecture, literature and the like, I still feel somehow compelled to be just a little uncomfortable when confronted with my Southern roots, in certain situations. If I never see another episode of the “Beverly Hillbillies” it would be fine by me. Or hear Paula Deen say for the umpteenth time, “just add a stick of butter, ya’ll”,  for that matter. Believe me, I will be okay with it.

However, my hesitation in owning up to my upbringing has improved over the years and I no longer feel like I must bear the disgrace for all the rednecks, hypocrites and/or bigots, that have stereotyped my beloved South.

I feel pride when I’m asked about where I’m from, my family history and tell the story of my 3-time great-grandfather, Captain Tristram Thomas (later made General), who led a small band of patriots at the battle of Hunt’s Bluff, seizing a British flotilla in 1780 during the American Revolution. I feel pride discussing my late dad’s technique for whole hog barbeque (Williamsburg County style) with a certified BBQ judge and seeing him hang on my every word. I feel pride seeing my own daughter take an interest in growing a garden and witness the beginnings of a true love of the land take hold in her.

One of my great grandfathers was a real American Revolutionary War hero. I probably would have bragged more if I’d known when I was younger. But he was a hero not me, so I’m not sure if this means that much. Makes a nice story though… we Southerners do love stories.

Living for almost 20-years in a town that was (and is) mostly inhabited by non-Southerners, yet is located squarely in the South, gives one a unique viewpoint. Twenty years ago I was made fun of (occasionally) for my accent, but I will admit that a few men I dated along the way (the non-Southern ones) mentioned they found my accent alluring. Of course this could have been a load of bull.

I also know a good many non-Southerners (some who married into my family) who, I believe, truly wish they were born Southerners. To their credit they try very hard to fit in and do a pretty good job on the outside, at least. They will eat grits and cornbread and enjoy them. They’ll drink canned beer or sip bourbon drinks on occasion, learn about local flora and fauna and some will even take on a Southern-inspired hobby – like bass fishing, duck hunting, or NASCAR. But you know what? While all those things are great (well, I’m still deciding about NASCAR) – they aren’t what being Southern is really all about.

And I have no clear-cut answer to that effect, ya’ll. I’ve read that being Southern “is all about tradition” and being Southern “is about strong family ties – keeping in touch with your kin… whether you like them, or not.” Other humorous definitions include these gems:

  • You can correctly use “fix” as a verb.  As in, “I’m fixing to go to the store.”
  • You say “yes ma’am” or “no sir” to anyone 5 years older than you
  • You measure distance in time, not miles
  • All soft drinks are referred to as “coke”, no matter the brand
  • You use the term “bless her heart” to mean both pity and insult, usually at the same time
  • Southern babies are named after a family member, even those long gone (but not forgotten!)

I have read detractors state that Southerners are inexorably fake and “they’ll show you all kinds of friendliness to your face, but then turn around and talk about you behind your back.” I’ve certainly had that happen, but no wait, that was one of my college roommates from New England…Ha!

Still, I think the following quote from author Jan Norris sums it up quite nicely:

“Being Southern isn’t talking with an accent…or rocking on a porch while drinking sweet tea, or knowing how to tell a good story. It’s how you’re brought up — with Southerners, family (blood kin or not) is sacred; you respect others and are polite nearly to a fault; you always know your place but are fierce about your beliefs. And food along with college football — is darn near a religion.”

So true. I’ll add, that to me, being Southern is about being genuine, true to yourself and your family, and taking enough out of history to either learn to never repeat it if it was horrible, or remember and honor it, if it was wonderfully good. Whether you are Southern, or not, what does “Southern” mean to you?

Old-fashioned fig preserves never go out of style…

on the plate 1

Figs! Yes, I finally hit the fig lottery recently when my family visited upstate South Carolina and the Happy Berry Farm in Six Mile. If you read southbyse.com with any regularity you may know that I have been on the hunt for bountiful fresh figs – the figs of my youth – for a couple of years now.

Even when I was sequestered in northern Alabama (where there’s a farm at every other mile marker) for 18 long months, I had a tough time finding enough local figs to make my beloved fig preserves. So this year I campaigned since May for a long weekend at summer’s end to be spent at my family’s cabin in Oconee County, SC and ‘googled my way across the internets’ to find the Happy Berry.

I checked their online crop reports regularly, relieved to see that their figs would just be coming to harvest the weekend of our trip. They also had a good stand of both blueberries and black berries plus a surprise – table grapes! The abundant rain that has soaked the South slowed the ripening of pretty much everything at the farm. Alas, we arrived during what in past years may have been the end of the season, this year good fortune plopped us smack dab in the middle.

The Happy Berry in Six Mile, SC. They sure made me happy!

The Happy Berry in Six Mile, SC. They sure made me happy!

With buckets in hand, off we went blueberry picking, which was slower than I expected and while there were some blackberries we could try and find, the hot August sun and rising humidity veered us back toward the ‘old tenant house’. Next we began our search for figs, and after scouring the trees, plucking a few pounds. Altogether our haul was about 2 pints of blueberries, 6 pints of blackberries and about 5 pounds of figs. With our cooler full we had to pass on the table grapes, but now that we know – we’ll be back with two coolers next year!

Not many folks outside the south are familiar with whole preserved figs. This is a real shame. Cooked simply into a thick, honey-like syrup, fig preserves are delicious on hot biscuits on a cold morning. Not to mention toast, English muffins and waffles. The syrup is a wonderful mix-in for salad dressings and marinades – you will keep even the most perceptive foodie guessing with exactly what is that ‘secret ingredient’.

Pureed fig preserves are a wonderful mix in to muffins and coffee cakes too – think ‘streusel’. In the fall, I like to serve rough chopped fig preserves with some sharp or tangy cheese, a few pecans or walnuts and voilà a quick, creative appetizer that goes nicely with a glass of red.

I think fig preserves and figs in general are right up there with okra and beets as under-appreciated foods. My parents had three strong-producing fig trees in their yard (along with pecan, black walnut and kieffer pear trees) that have sadly gone the way of the dodo. My memories of expectantly watching the fruit grow, then arduously waiting (for an 8 or 9 year old!) for ripening, and then finally helping my mother preserve jar upon jar, are as thick, warm and precious as the fig preserve syrup ladled onto a hot ‘cat head’ biscuit. I hope the feelings those memories evoke never leaves me.

The lemon slices in fig preserves are a real treat too - we would fight over them at my house.

The lemon slices in fig preserves are a real treat too – we would fight over them at my house.

Fresh figs picked by yours truly. This was after spending a day in a cooler and traveling back to Beaufort. Ripe figs will 'crack' a bit like you see here - it means they are yummy!

Fresh figs picked by yours truly. This was after spending a day in a cooler and traveling back to Beaufort. Ripe figs will ‘crack’ a bit like you see here – it means they are yummy!

Remove the green stems from the figs and wash them off before tossing -gently -into the pot with the lemons, water and sugar.

Remove the green stems from the figs and wash them off before tossing -gently -into the pot with the lemons, water and sugar.

After almost 2 hours of simmering and occasional stirring.

After almost 2 hours of simmering and occasional stirring.

After 3 hours, the figs have turned a darker color. You can ladle off any foam if you want or leave it.

After 3 hours, the figs have turned a darker color. You can ladle off any foam if you want or leave it.

Have all jars, lids and rings washed and sanitized (I hold prewashed jars and lids in a pot of simmering hot water). This is my typical setup - love the wide mouth funnel. Helps reduce the messiness, a little anyway!

Have all jars, lids and rings washed and sanitized (I hold prewashed jars and lids in a pot of simmering hot water). This is my typical setup – love the wide mouth funnel. Helps reduce the messiness, a little anyway!

The jarred preserves. This batch made 6 pint jars.

The jarred preserves. This batch made 6 pint jars.

a

Fig Preserves

  • 8 cups whole fresh figs, washed and green stems removed
  • 4 cups sugar
  • 4—5 whole lemons sliced, seeds removed
  • 2 cups of water
  • 1/4 tsp salt
  • whole cloves – optional*

In a very large pot mix the sugar, water and salt. Stir in the figs and lemons. Mix gently but thoroughly as the pot slowly heats. Bring the mixture up to a low boil and continue to stir occasionally. This can take 30 minutes. Allow to boil gently for 4-5 minutes.

Turn heat down to a simmer. Continue to cook for 2 to 2 ½ more hours, stirring regularly. Adjust heat as needed to keep a low simmer but not burn the preserves. Prepare jars, lids and rings by washing, rinsing and placing I a hot water bath, boiling them for several minutes and keeping them hot. When the fig preserve syrup is thick it is time to can the preserves.

Fill a few jars at a time, 2 or 3, leaving 1 ¼ inch space at the top of the jar. Be sure to include at least 2 slices of lemon in each jar. Wipe mouth of jars after filled, so that there is no syrup or preserves to interfere with the lid sealing. I like to add a few whole cloves to my preserves – 3 or 4 – because I love cloves, but this is optional. Top each jar with a lid and secure with a ring.

As I’ve stated in the past you can return the jars to a hot water bath and boil for 7-8 minutes. However, if your preserves are hot when you filled your jars and your jars are hot (and have been sanitized) they should seal after filling, and there is no need to use a boiling hot water bath. All jars should seal within 1 hour of canning – you should hear a “pop” and the top of the lid will be slightly indented down. If not, then place in a boiling hot water bath.

Ch-ch-chia – super food of champions… and you!

moist muffins

Today’s post veers slightly away from the typical ‘southernesque’ southbyse.com recipe by using an ingredient I’ve recently come to know and love… cha cha chia! Now I am one of those nut and seed people – I love them! Walnuts, pecans, sunflower seeds, almonds, hazelnuts – I enjoy them all.

I also love surprises, even when I eat – well, nice surprises – not the ‘my food is under/over cooked’ kind. Dear Hubby gives me the single arched eyebrow whenever we eat sushi and an hour afterwards I let out a giggly “Ha!” as a stray masago roe pops in my mouth. So maybe that tidbit may be considered ‘TMI’ – to me it’s an unexpected, yet happy moment.

Yes, chia is the seed used in the chia pet, albeit I would never eat the chia seeds from a toy/household decoration. My organic chia comes from Herban Marketplace, our local go-to all-natural, organic market, where I can buy in bulk or prepackaged. The health benefits of chia are astounding and I find myself adding them to salads, baked goods, cereal, and yogurt.

Fiber-filled chia seeds also contain more omega-3s in one serving than a serving of salmon. Legend has it the Aztecs ate these little seeds before going into battle. This tiny seed can absorb 10 times its weight in water when added to drinks and food. This makes you feel fuller, increases muscle hydration, and controls your blood sugar by slowing down how fast you burn carbohydrates, giving you longer lasting energy. The powers of this super food translate into big beauty benefits too as Chia are more than 60 percent essential fatty acids, which strengthens skin, hair, and nails.

Substitute chia for poppy seeds to get the health benefits along with the nice crunch! Orange Chia muffins fall into this category. Using olive oil, fresh citrus and organic white and whole wheat flour keeps these breakfast treats healthy and filling!

Fresh orange juice and zest make a difference in this recipe.

Fresh orange juice and zest make a difference in this recipe.

White whole wheat flour is awesome! I use it a lot in baking - with the lightness of white flour but more fiber!

White whole wheat flour is awesome! I use it a lot in baking – with the lightness of white flour but more fiber!

Mix the wet ingredients together in one bowl and...

Mix the wet ingredients together in one bowl and…

The dry ingredients together in another bowl.   The secret to light, fluffy muffins is to mix the wet and dry ingredients together until just combined - no over mixing!

The dry ingredients together in another bowl. The secret to light, fluffy muffins is to mix the wet and dry ingredients together until just combined – no over mixing! Check out the chia seeds too.

Fill lined muffin tin with the batter.

Fill lined muffin tin with the batter.

Here they are hot out of the oven ! Cool on a rack and store in a covered container.

Here they are hot out of the oven ! Cool on a rack and store in a covered container.

Orange Chia Seed Muffins

  • 2 ½ cups flour (1 ½ cups all-purpose flour plus 1 cup white whole wheat or regular whole wheat)
  • 3 tsp baking powder
  • 1 tsp fine sea salt
  • ½ cup sugar (preferably organic Demera)
  • ¾ cup milk (skim, 1% or 2% will work)
  • 1/3 cup extra virgin olive oil
  • Juice from 1 orange (about 1/3 cup) including any pulp
  • 1 tsp fresh grated orange zest
  • 2-3 tablespoons chia seeds
  • 2 eggs, lightly whisked

Preheat oven to 350 degrees F. Oil muffin tin or line with paper muffin cups. Sift flours into a large bowl, add baking powder, salt, sugar and chia seeds.

In a separate bowl, whisk together the eggs until frothy. Add in the milk, oil, orange juice and zest, and whisk together well. Add in dry ingredients all at once. Mix only until ingredients are just combined, to ensure muffins stay light and fluffy. Spoon into prepared muffin tin. Bake for approximately 18-20 minutes or until tops of muffins spring back when pressed.

Makes 12 medium-sized muffins.

Simply South Carolina Peach Pie

on the plate 1

Summer in South Carolina means peaches. From roadside stands to supermarkets, this delectable fruit graces our shelves and palates from early June straight through to September.

South Carolina is #2 in the nation in peach production (second only to California). No hurt feelings to any Georgia natives out there, but we lead all southern states – including Georgia! – we are fondly called the “Tastier Peach State.” As a matter of fact, the peach is SC’s state fruit.

This pie recipe brings me back to my childhood growing up in Columbia, SC and lazy summer nights on the ‘Bluff’ with my family and our extended family of cousins and neighbors. Throw in a fish fry with bluegills caught that day, hot homemade hushpuppies, cold slices of watermelon and an evening of firefly catching (plus some tall tales told by my dad and uncle) and to me that is what childhood should be like.

I’ve heard that one can immerse a peach in boiling water for a few seconds and the skin will slip right off. Has anyone out there ever tried this? I’d love to know how it worked for you. I sort of enjoy peeling fruit (yes, I admit it) and am actually good at it if I do say so myself – fast and accurate, removing the peel without much fruit attached. I am also fairly good at removing a whole peel in one piece. But that trick works better for apples than peaches…

Anyhow, while I love a good marinade or barbeque sauce infused with peach flavor, peach ice cream and an occasional fuzzy navel (brunch, people!) my favorite way to eat a peach is either fresh out of hand or in a pie. Homemade peach pie is one of those desserts that requires little accoutrement either in the pie itself or served along with it, in my humble opinion.

The secret to really great peach pie is: Don’t muck it up with a bunch of spices, additions or worse, odd sauces served along side. If you have a flaky, buttery pie crust and perhaps a dollop of quality vanilla ice cream you’ve got a winner. Let the peaches speak for themselves!

Lovely, fragrant SC peaches. Our abundant rain has made the peaches larger than normal and I found them very flavorful nonetheless.

Lovely, fragrant SC peaches. Our abundant rain has made the peaches larger than normal and I found them very flavorful nonetheless.

Cups of fresh peeled  peaches... squeeze on some fresh lemon juice.

Cups of fresh peeled peaches… squeeze on some fresh lemon juice.

Gently mix the peaches with the dry mixture of sugar, cornstarch and salt. Next roll out your pie crust and fit to the pie plate.

Gently mix the peaches with the dry mixture of sugar, cornstarch and salt. Next roll out your pie crust and fit to the pie plate.

Pour the peaches into the pie shell and ...

Pour the peaches into the pie shell and …

Add the top pie crust . I like a lattice crust peach pies - so pretty and allows me to better gauge when the pie is ready to come out of the oven.

Add the top pie crust . I like a lattice crust peach pies – so pretty and allows me to better gauge when the pie is ready to come out of the oven.

Here we go! Right out the oven and wow it smells good. It's tempting to dig right in, but be warned... slicing a hot or warm pie equals a runny pie. If you do not care, I say go for it! Otherwise, allow to cool almost completely (or refrigerate) before slicing.

Here we go! Right out the oven and wow it smells good. It’s tempting to dig right in, but be warned… slicing a hot or warm pie equals a runny pie. If you do not care, I say go for it! Otherwise, allow to cool almost completely (or refrigerate) before slicing.

South Carolina Peach Pie

7-8 medium to large peaches, preferably SC
Juice of ½ of a fresh lemon (no seeds!)
2/3 cup* Demera sugar or regular cane sugar
½ tsp salt
3-4 tbl cornstarch
Pie pastry for a double crust
Egg wash, optional

Preheat oven to 400 degrees F. Peel the peaches and slice. You should have between 4 ½ and 5 cups of sliced peaches. Taste one slice to determine sweetness and juiciness. If peaches are very sweet you can decrease the sugar by 2 to 3 tablespoons. If the peaches are really ripe and juicy use 4 tablespoons of cornstarch, if they are not 3 tablespoons should suffice.

Squeeze the lemon juice over the peaches and gently stir to distribute. In a small bowl mix the sugar, cornstarch and salt. Pour this over the peaches and stir gently.

Place the bottom pastry in a 9-inch pie pan. Reserve the other pastry for the top crust which you can cut for a lattice top, or use whole (cut slits in top if using a whole crust). Pour the peaches into the pie pan and top with the crust.

In you wish, make an egg wash out of one whisked egg yolk and a tablespoon of water do this and brush over the crust (I did not use an egg wash on this pie). Bake in the preheated 400 degree F oven for 10-12 minutes and then reduce heat to 350 degrees and bake another 30-40 minutes or until the fruit is soft and the pie is all bubbly. The egg wash can make the crust brown quickly so if that happens cover the edges of the pie with some foil.

Cool for at least 2 hours before slicing. Serve with vanilla ice cream or whipped cream. Note that placing the pie in the refrigerator will allow the pie filling to thicken – if you slice while warm it will most probably be runny…

Serves 8… or maybe 4 peach pie fanatics… or maybe just one depending on the severity of your peach love!

Cool and crisp summer salad – Two Beans and a Little Peanut!

finished salad

Wow, this week has got away from me. Again. Before things get out hand I have a post today which will surely make any true southerner happy as it features an ingredient beloved most, the peanut. Of course, in the South we have a penchant for taking something ordinary and making it, if not extraordinary, then just plain ‘different’.

‘Different’ would probably be the word used to describe a boiled peanut by non-Southerners who take the leap of taste that is boiled peanuts. In my mind boiled peanuts are best when purchased green, boiled at home and chilled in my own refrigerator. Pop open a nice cold beer, grab a bowlful of peanuts and find yourself either:

1) a hammock, preferably near a sea breeze; or

2) a comfortable lounge chair on your favorite porch

Add in some good company who are of a similar disposition as yourself (or at least decent conversation) and you’re set for several hours of good times. Boiled peanuts also make fine company for a fishing trip, college football tailgating and an afternoon at the beach.

In my household, my daughter and myself are the boiled peanuts lovers – Dear Hubby can leave them, apparently. I still cannot quite figure that one out. But this leaves plenty for Girlie Girl and me, although she has not quite mastered opening them yet, so that task falls on me. I’ll give her one more summer and then she’ll need to step it up. Hey, she can open a steamed oyster, why not a peanut?

If you’re not familiar with preparing basic boiled peanuts please see my previous post, The Art of Peanut Perfection. My recipe today is one I thought about for a long time, since 3-bean salad is a summer time favorite of mine. I thought boiled peanuts would be a good replacement for kidney beans (not my favorite, anyway!) My biggest obstacle was shelling enough peanuts without me and others (who shall remain nameless) eating them all first. I finally got my chance after Girly Girl and I practically overdosed on them at Edisto Island. We had eaten enough, for that day at least.

Use fresh beans if you can – fresh wax beans are practically impossible to find here – so I used canned here. Fresh greens beans are bountiful now as are peanuts – no reason not make this pretty make-ahead side dish that gets better even after a day or two in the frig! The addition of the cayenne pepper gives it a bit of a kick too, but no worries… just relax back in that hammock and crack open another cold one!

Fresh green beans and raw 'green' peanuts - pretty!

Fresh green beans and raw ‘green’ peanuts – pretty!

"Other" ingredients include onion, bell pepper, red wine vinegar, olive oil, agave nectar, and spices.

“Other” ingredients include onion, bell pepper, red wine vinegar, olive oil, agave nectar, and spices.

Here are the boiled peanuts, shelled. Yum!

Here are the boiled peanuts, shelled. Yum!


Par boil the fresh green beans lightly, cool and snap into thirds. Mix the vinaigrette together and simply add to all the other ingredients in a large bowl. Mix gently, cover and refrigerate until it's eatin' time!

Par boil the fresh green beans lightly, cool and snap into thirds. Mix the vinaigrette together and simply add to all the other ingredients in a large bowl. Mix gently, cover and refrigerate until it’s eatin’ time!


2 Beans and a Little Peanut Salad

  • 2 cups cooked, shelled peanuts
  • 2 cups wax beans (fresh cooked or canned)
  • 2 cups fresh green beans, cooked and snapped into approx 2 inch pieces.
  • 1 medium size sweet Vidalia onion, peeled and sliced into thin rings
  • ½ cup sweet bell pepper, chopped
  • ½ cup red wine vinegar
  • 1/3 cup olive oil
  • 1/4 – 1/3 cup agave nectar
  • ½ tsp celery seed
  • ½ tsp pepper plus extra to taste
  • ½ tsp garlic salt
  • ¼ tsp. ground cayenne pepper mixed with 1/4 tsp ground black pepper

In a medium bowl mix the vinegar, oil, nectar and spices and salt. Wisk together well and set aside.

In a large bowl mix the peanuts, beans, onions and bell pepper gently. Pour approximately ½ the vinaigrette (above) over the vegetables and mix gently. Add a little more vinaigrette and mix again. Cover the salad and refrigerate at least 2 hours before serving. Add a bit more vinaigrette before serving, mixing well to coat all the vegetables. Note that you probably will not use all the vinaigrette, however…

Leftover vinaigrette is great as a salad dressing base – just add in some citrus like lemon or orange juice and maybe some minced thyme or oregano.

Back in the saddle with some old fashioned summer shortcake…


on the plate 2

The saying goes that “absence makes the heart grow fonder” may or may not be true for everyone but when it comes to my southbyse.com blog, I agree wholeheartedly. I am happy to be back blogging and cooking!

I decided it would also be a good time to ‘refresh’ the site a bit too. The new background photo is of an old homestead on Edisto Island, SC – one of my family’s favorite places to spend time, doing nothing – or as close to that as we possibly can! We happened upon this sight when out exploring one afternoon.

Nestled in perfect contentment among a large overgrowth of field and wood, what was once a Lowcountry beauty still radiates a shabby luster in the waning days of a long Southern summer. I seriously wanted to venture in toward the house, but my fear of the Eastern Diamondback, poison oak and deer tick kept me smartly along the roadside. Perhaps if our paths cross in cooler weather I’ll don steel-toed boots, bug repellent, and some courage to check out this place closer. We’ll see.

My recipe is perfect for summer – shortcake. The streusal-like topping adds a subtle twist elevating every mouthful well above the traditional shortcake ,and waaaaay past any ‘off the shelf’ cake. With the abundant weather (rain) experienced this summer in the South we are enjoying a bonanza of local fruits and berries. While it may be past strawberry season most places (except in the Blue Ridge perhaps), there are plenty of plump blueberries, blackberries and raspberries to be found. Peaches make a delicious filling too, so use your favorite or create a combination!

This recipe serves a crowd and makes a lovely presentation when filled whole, but you can also serve as individual shortcakes by creating slices (like I did) or bake in a muffin tin. This shortcake is also a good ‘make ahead’ dessert as the cake stays moist and tender for up to three days – just wrap in plastic after it cools and refrigerate. Allow the cake to sit out and come to room temperature before filling and serving. And by all means use real whipped cream – anything else (well maybe, besides homemade custard) would be a travesty!

The best fruit of summer deserves the best shortcake…don’t you think? 

Mix the streusal topping in a separate bowl. It should be crumbly.

Mix the streusal topping in a separate bowl. It should be crumbly.

Begin the 'cake' by cutting the butter into the dry ingredients.

Begin the ‘cake’ by cutting the butter into the dry ingredients.

Mix all the premixed wet ingredients into the dry ingredients, similar to making muffins or a quick bread.

Mix all the premixed wet ingredients into the dry ingredients, similar to making muffins or a quick bread.

Press the 'cake' into the prepared pan.

Press the ‘cake’ into the prepared pan.

Top with the streusal and pop into the preheated oven.

Top with the streusal and pop into the preheated oven.

After about 20 minutes you'll have shortcake! Allow to cool on a rack before slicing and splitting open - fill with fresh berries, fruit and whipped cream!

After about 20 minutes you’ll have shortcake! Allow to cool on a rack before slicing and splitting open – fill with fresh berries, fruit and whipped cream!

These luscious beauties deserve a great shortcake and real whipped cream!

These luscious beauties deserve a great shortcake and real whipped cream!

Another shot of tonight's dessert. A little bit of heaven on a plate...

Another shot of tonight’s dessert. A little bit of heaven on a plate…

Best of Summer Shortcake

  • ½ cup brown sugar
  • 6 tbl sugar plus extra
  • 2 ½ cups all-purpose flour
  • ¾ cup unsalted butter
  • 1 tbl baking powder
  • 1 tsp sea salt (fine)
  • 1 large egg
  • ¾ cup buttermilk (non fat or light)
  • 3-4 cups of fresh fruit, washed and sliced if necessary (strawberries, blueberries, blackberries, and peaches all work well but use your favorite – or a combo!)
  • 1 cup heavy whipping cream

In a small bowl mix the brown sugar, ¼ tsp salt and ½ cup flour. With a pastry blender or fork cut in 4 tablespoons butter until the mixture resembles small peas. Set aside.

Preheat oven to 425 degrees and grease one 9-inch square (or round) baking pan. In a large bowl mix remaining flour, 4 tablespoons sugar, ¾ tsp salt, and baking powder. Cut in ½ cup butter until mixture resembles small peas or course crumbles. In another small bowl whisk the egg and milk. All at once stir the egg/milk mixture into the flour /butter mixture and mix until just combined.

Spread this into the prepared pan and sprinkle on the streusel topping. Bake about 20 minutes. Do not over bake. Allow shortcake to cool slightly on a rack and then carefully remove from the baking pan to cool completely on the rack. At this point you could also wrap the cooled shortcake in plastic wrap to finish later.

Prepare your fruit – strawberries, blueberries, blackberries, peaches are wonderful or a combination. You may sprinkle extra sugar on your fruit if you like. In a separate mixing bowl whip 1 cup heavy cream with 2 tablespoons sugar until stiff peaks form. Set aside or keep chilled in the refrigerator.

After the shortcake is completely cooled and when you are ready to serve, carefully cut large squares* of shortcake and using a serrated knife spilt each piece of shortcake in two. Place the bottom piece on an individual plate, top with some fruit and a small dollop of whipped cream, cover with the top piece of shortcake and add more fruit and whipped cream. Serve immediately.

*Alternatively if you used a round cake pan, you may use slices OR split the entire cake in half and prepare the whole shortcake using all the fruit and whipped cream. This works great and is quite the showstopper if you are serving a crowd.

Click here to download a printable PDF of this recipe: Best of Summer Shortcake

Softshell crab season in the Lowcountry equals some real good eatin’!

softshell crab

If you have read my blog here at southbyse.com or the blog I write for the Hilton Head Island V&CB, you know I love blue crab. I like to catch blue crab and I like to eat blue crab. This time of the year is especially great because it is the three to four-week local softshell crab season. Blue crabs molt throughout the year but this time of year many are molting at once. The in-between time of losing their hard outer shell and growing a new one they are, well, soft and yes, you can eat the whole dang crab (well pretty much most of it). It is interesting to note that crabs will mate only when the mature female crab has just molted and is still a soft or buckram crab.

Since we live in an area where blue crabs are abundant we can buy softshell crabs fresh – they are in fact, still alive. We are so lucky here in the Lowcountry to have access to such fresh crab, as most Americans who go to the trouble and expense of purchasing and preparing softshell crabs at home will have to settle for frozen. Not to belittle this, as I have had frozen softshell crabs and they can be quite delish, but fresh is a true delicacy.

Have the seafood market clean your crabs for you – they know just what to do. If you happen to catch your own or have live softshell crabs given to you, I suggest you use the great cleaning instructions found in the New Basics Cookbook (by Rosso & Lukins) or you can follow the instructions on the food blog called Coconut & Lime.

Be prepared to cook your fresh, softshell crabs the day you purchase them, as they do not keep unless they are cleaned and frozen. I have a very definite idea of how to cook fresh softshell crabs (of course I do!) and I’m passing this along to you now. Do not ruin your crabs with some kind of fancy batter or Heaven-forbid, a deep fryer (!) These are not onion rings…

Simple is best with fresh softshell crabs. My favorite recipe is based on the one found in the The Silver Palate Good Times Cookbook (also by Rosso & Lukins) and while it does include some herbs in the soaking mixture, you could leave those out without losing any appeal. You must use real butter (Ghee is great because it is already clarified) and real lemon. Soaking the crabs in the milk makes them plump and this is especially important if using previously frozen crabs. Add a light coating of seasoned flour and a hot pan, and you will have a seafood dinner that contends with the best restaurant in town!

Fresh, live and local! Softshell crabs at my favorite local seafood market, the Sea Eagle.

Fresh, live and local! Softshell crabs at my favorite local seafood market, the Sea Eagle.

Here are my crabs waiting for their milk bath.

Here are my crabs waiting for their milk bath.

Mix the milk and herbs together before...

Mix the milk and herbs together before…

getting their soak on! I like Herbs De Provence - its just so fresh, pairs well with the crab.

getting their soak on! I like Herbs De Provence – its just so fresh, pairs well with the crab.

After a good soak, roll the crabs in the seasoned flour and have your butter-laced pan very hot.

After a good soak, roll the crabs in the seasoned flour and have your butter-laced pan very hot.

I like to use Ghee or clarified butter because it has a higher smoke point than regular butter - makes sauteing the crabs to a delicate crunch - without burning - easy peasy!

I like to use Ghee or clarified butter because it has a higher smoke point than regular butter – makes sauteing the crabs to a delicate crunch – without burning – easy peasy!

Here the crabs have been turned over and cooked through, Crispy but you can still tell they are crab, not a bunch of fried goo!

Here the crabs have been turned over and cooked through, Crispy but you can still tell they are crab, not a bunch of fried goo!

I like to pour the fresh lemon juice over the crabs while they are still in the pan. Then remove the crabs to a warm plate and add the rest of the butter back to the pan. Stir and pour everything in the pan over crabs. Perfection!

I like to pour the fresh lemon juice over the crabs while they are still in the pan. Then remove the crabs to a warm plate and add the rest of the butter back to the pan. Stir and pour everything in the pan over crabs. Perfection!


Another shot of this beautiful entree. I served the crab with garlic smashed potatoes and a saute of Vidalia onion, zucchini and baby portobello mushrooms.

Another shot of this beautiful entree. I served the crab with garlic smashed potatoes and a saute of Vidalia onion, zucchini and baby portobello mushrooms.


Softshell Crabs “Sterling”

Technique based on a recipe in the Silver Palate Good Times cookbook.

  • 1 cup milk (no less than 2%)
  • 2 tsp dried tarragon
  • 1 tsp Herbs de Provence
  • 4 fresh soft-shelled crabs*, cleaned
  • ½ cup all-purpose flour
  • salt and fresh ground pepper
  • 1/3 cup + Ghee (clarified butter) OR ½ cup unsalted butter
  • Juice of 1 lemon
  • Fresh parsley, washed, dried and minced

Place crabs in one layer in a shallow dish. Combine herbs and milk and pour this mixture over the crabs. Cover the crabs with plastic wrap and refrigerate. Allow the crabs to soak in the milk mixture about 1 hour.

Drain the crabs and discard the milk. Season the flour with salt and pepper and dredge each crab in the seasoned flour. In a large sauté pan (the pan should be large enough to cook all 4 crabs at once) over medium heat melt all but 2 tablespoons of the Ghee (or all but about 3 tablespoons of regular butter). Bring up heat to high and add the crabs. Cook 4 to 5 minutes per side.

Top the crabs with the fresh lemon juice. Remove crabs to a warm platter. Melt rest of butter in the sauté pan and stir. Pour this over the cooked crabs and sprinkle them with the parsley. Serve at once.

Serves 2 crabs per person as an entree or 1 each, as a first course. Doubling the recipe is fine as long as you only sauté 4 crabs (at the most) in the pan at one time. * You can use frozen crabs but allow to soak in the milk mixture at least 1 hour and up to 2 hours.

Pucker up for spring-time lemon squares

on the plate 1

So with this post southbyse.com has reached its 100th post. Honestly I had hoped to hit this mark a few months ago but c’est la vie. After pondering a few ideas of what this milestone post should be, I decided to throw out all ideas and just go with a favorite recipe. I am a lover of all things lemony and lemon squares are one of my favorite recipes because they are both forgiving and easy – so easy a kid can make them with just a little assistance. It’s hard to screw them up in other words, and well, they just plain taste great.

This recipe is an oldie from a fundraising cookbook from the “Medical University of SC Student’s Wives Organization” dated 1979 and given to me as a gift from one of the wives – I was 15. As antiquated as referring to the organization as a “wive’s” club is today, it does contain some really awesome recipes like pecan pick-ups, scalloped oysters, Sally Lunn bread and these lemon squares.

One can use plain all-purpose flour, however, in this version I decided to include sorghum and white whole wheat flours in the shortbread crust. If your diet is gluten-free I’d think lemon squares could be a great dessert-fit, since you could easily substitute gluten-free flour (or a combination of gluten-free flours to make a substitute for all-purpose) and the rest of the recipe would follow along just fine. I simply added the sorghum to try it out, as luckily my family has no gluten issue.

My only tips in making these is to not over bake, and slice after they have cooled – it’s easier that way.

The shortbread crust ingredients - I used white whole wheat flour and sorghum flour. The shortbread was light and not dry with a good (but not overwhelming) butter flavor.

The shortbread crust ingredients – I used white whole wheat flour and sorghum flour. The shortbread was light and not dry with a rich (but not overwhelming) butter flavor.

The shortbread crust goes together quickly - just press the dough into a 9 x 13 inch pan.

The shortbread crust goes together quickly – just press the dough into a 9 x 13 inch pan.

Here is that same crust baked and ready for the filling.

Here is that same crust baked and ready for the filling.

Girly Girl helped me with this recipe - she's a master at cracking eggs now.

Girly Girl helped me with this recipe – she’s a master at cracking eggs now.

Once you whisk the eggs some, just mix everything into the bowl. So easy.

Once you whisk the eggs some, just mix everything into the bowl. So easy.

Here's the fresh lemon juice and zest. I measured out a half cup of juice from the 2 large lemons I used.

Here’s the fresh lemon juice and zest. I measured out a half cup of juice from the 2 large lemons I used.

Pour the filling over the crust and bake in a preheated 350 degree oven 25 minutes.

Pour the filling over the crust and bake in a preheated 350 degree oven 25 minutes.

Here the pan of lemony goodness right out of the oven. I'll sprinkle with confectioner's sugar, allow to cool and cut into squares.

Here the pan of lemony goodness right out of the oven. I’ll sprinkle with confectioner’s sugar, allow to cool and cut into squares.

Lemon squares are good for travelin' and are a bake sale favorite! I like to serve them when tailgating but of course we've got 4 more months  before college football season cranks up...

Lemon squares are good for travelin’ and are a bake sale favorite! I like to serve them when tailgating but of course we’ve got 4 more months before college football season cranks up…

Lemon Squares

  • 1 ½ cup white whole wheat flour*
  • ½ cup sorghum flour*
  • ½ cup confectioners (powdered) sugar plus extra
  • 1 cup of butter, softened
  • Juice of 2 large lemons – plus zest from both
  • 2 cups sugar
  • 3 tbl all-purpose flour
  • ½ tsp baking powder
  • 4 eggs

Preheat oven to 350 degrees. Mix the first 4 ingredients (except the extra confectioners sugar) in a mixing bowl. Press this dough into an oiled 10 x 13 baking pan. Bake for 20 minutes.

Meanwhile, in a large mixing bowl whisk eggs lightly. In a separate bowl mix the sugar, flour and baking powder. Add this to the eggs and mix until very well combined, then stir in the lemon juice and zest.

Remove the shortbread from the oven and pour the lemon filling over the crust. Bake back in the preheated oven (350 degrees) for 25 minutes – until center has just cooked through – do not over bake!

Remove to a rack to cool. Sprinkle with confectioners sugar while warm and slice into squares after completely cooled. Makes approximately 30 lemon squares.

* You can also use 2 cups of regular all-purpose flour or try a combination of flours to see what you like best. This is one recipe that is very forgiving.

Peter rabbit is dressed to impress with Potatoes Anna

whole, on the plate

I read somewhere recently that this spring is “bursting with story angles;” the opening of baseball season and PGA TOUR golf (including our own fabulous RBC Heritage on Hilton Head); Earth Day, Passover and of course, Easter just to mention a few (I’m leaving out tax day folks!). Growing up in my parent’s southern home, Easter was all about tradition, starting with choosing just the right outfit for Sunday services, bringing the Easter baskets out of storage, coloring eggs and “being good” so the Easter bunny would look favorably upon me with a BIG chocolate bunny (hopefully bigger than my younger brother’s!).

And no doubt it was about the food we would eat at that big Southern Sunday dinner: baked ham, scalloped potatoes, deviled eggs, green beans, fresh asparagus, homemade rolls and a seemingly light but rich dessert like strawberry shortcake, lemon pie or maybe a baked-from-scratch poundcake with local berries and whipped cream. Little did I realize that our household was in fact being ‘green’ to a certain extent – reusing the same Easter baskets (made out of wicker or wood) year after year, picking strawberries for our dessert at the local berry farm, and coloring eggs gathered by my Aunt Janice at her family farm. All those customs that at the time seemed very old-fashioned are by all accounts “cool” these days. It’s good – and hip – to be green!

If you’re doubting me on incorporating a greener Easter here are some tips I found. I’m hopping, errrr… hoping to try out some natural derived red, purples, pinks and greens for our eggs this year.

  • Buy farm raised eggs: If you are buying eggs, look for farm-raised eggs. This means that the chickens were not living in boxes or crates plus you’re supporting local farmers. If they’re organic then all the better.
  • Make your own Easter egg dye: If you choose to dye eggs this Easter, consider making your own and giving your kids (and yourself) a fun learning experience. Here are some examples of ingredients: Beets & Cranberries for Pink, Red Cabbage or Blueberries for Blue, Red Onion Skins for Red, Yellow Onion Skins for Orange, Grape Juice for Lavender, Orange or Lemon Peels for Yellow, Spinach for Green, and Coffee for Brown. Boil the eggs and any of the mentioned ingredients for color with a teaspoon of vinegar for 15 minutes…and voilà you have beautifully dyed Easter eggs!
  • Don’t buy cheap plastic Easter baskets: If you don’t already have Easter baskets, consider buying a nice well-made basket of wood or other sustainable material that can be used year after year.
  • Use real grass clippings or recycled paper in baskets: If you are making Easter baskets this year, don’t buy the plastic grass, consider using real grass or find some old magazines (funny pages or old tissue paper works great!) & cut up the pages to be used as a colorful filling.
  • Buy fair trade and organic candy: To fill those baskets, choose fair trade and/or organic candy! That way you are supporting fair working conditions and keeping pesticides away from your loved ones. If it is locally produced then all the better!

Traditionally, my Southern Easter dinner includes scalloped potatoes, which are by all accounts richly holiday-worthy indeed. However, if you’d like to mix it up a bit, try Potatoes Anna, similar to scalloped potatoes minus the cream and cheese. Potatoes Anna certainly makes an impressive presentation either on a large platter, as I show in today’s post, or as individual servings that can be created by using small ramekins. The top tips for cooking this dish and having it come out perfectly are:

  • use the most uniform slices for the bottom layer (which will be the top) arranging them as perfectly as possible
  • use good quality butter (to make  the clarified butter) or organic Ghee
  • use a well-seasoned cast iron skillet (or a heavy duty, oven proof non-stick fry pan)

Will the uses for the cast iron skillet never cease? I think not!

To clarify the butter, melt it in a heavy saucepan. You will see foam rise to the top.

To clarify the butter, melt it in a heavy saucepan. You will see foam rise to the top.

Skim off the foam with a spoon.

Skim off the foam with a spoon.

What you are left with is clarified butter. It has much high smoke point that regular butter so it browns and crisps food nicely without as much chance of burning.

What you are left with is clarified butter. It has much high smoke point that regular butter so it browns and crisps food nicely without as much chance of burning.

It makes life easier if your potatoes are all about the same size.

It makes life easier if your potatoes are all about the same size.

The "ingredients" - I consider the cast iron skillet an ingredient in Potatoes Anna as it is very important in getting a perfect result.

The “ingredients” – I consider the cast iron skillet an ingredient in Potatoes Anna as it is very important in getting a perfect result.

Sliced potatoes in the Cuisinart. You can also use a mandoline slicer to get uniform slices.

Sliced potatoes in the Cuisinart. You can also use a mandoline slicer to get uniform slices.

The cast iron skillet.

The cast iron skillet.

Add clarified butter the skillet and swirl it around to coat  the bottom of the pan.

Add clarified butter the skillet and swirl it around to coat the bottom of the pan.

Start the first layer in the middle of the pan. Overlap the potatoes some. I use my "best" slices for the first layer - which will be the top.

Start the first layer in the middle of the pan. Overlap the potatoes some. I use my “best” slices for the first layer – which will be the top.

Build out the potato layer and drizzle with clarified butter and sprinkle with salt and pepper. Add the next layer starting on the outside in the opposite direction.

Build out the potato layer and drizzle with clarified butter and sprinkle with salt and pepper. Add the next layer starting on the outside in the opposite direction.

Okay, the layering of the potatoes is finished.

Okay, the layering of the potatoes is finished.

Cover with oiled foil and a very heavy oven proof pot.

Cover with oiled foil and a very heavy oven proof pot.

After 'crisping' on the stove top, check to see if a nice crust has formed. If it has remove to the preheated oven. If not continue on the stove for a few more minutes.

After ‘crisping’ on the stove top, check to see if a nice crust has formed. If it has remove to the preheated oven. If not continue on the stove for a few more minutes.

After roasting in the oven (with and without it's foil and heavy pot) the Potatoes Anna are ready for the platter!

After roasting in the oven (with and without it’s foil and heavy pot) the Potatoes Anna are ready for the platter!

Run a knife around the edge and carefully invert onto your serving platter. Crispy on the outside and layered, buttery creaminess on the inside. Perfect side dish for that Easter ham!

Run a knife around the edge and carefully invert onto your serving platter. Crispy on the outside and layered, buttery creaminess on the inside. Perfect side dish for that Easter ham!

Potatoes Anna

  • 3 lb. potatoes – boiling type like Yukon gold or red or your favorite variety of similar size
  • ¼ lb. clarified butter* or Ghee
  • About 1 ½ tsp. salt
  • Fresh ground pepper

If you do not have Ghee or would like to use your own clarified butter, here are the instructions. *Melt best quality butter (about 10 tablespoons) in a heavy saucepan. Slowly bring up the heat to a simmer. You will see foam forming. Skim this off with a spoon. Keep skimming off foam until all that is left is a yellow butterfat. Voila, you have clarified butter. Note that the skimmed foam is very good on popcorn! Set aside the clarified butter.

Peel the potatoes and slice into uniform 1/8” slices using a mandoline or the slicer insert in a food processor.

In a heavy frying pan – I use my handy cast iron skillet – add a tablespoon of clarified butter. Swirling it to coat the pan. Starting in the middle, place the potato slices radiating out toward the sides and overlapping slightly. After adding one layer, drizzle with another 2 tablespoons of the butter and sprinkle lightly with salt and several cracks of fresh pepper. Start the next layer on the outside, in the opposite direction working toward the center. Sprinkle with salt, more butter and cracks of fresh pepper. Keep making layers in this way until all the potatoes are used.

Place a piece of aluminum foil that is slightly larger than the skillet and has been oiled, over the potatoes. Place a very heavy pot that is slightly smaller than the circumference of the skillet you’re cooking the potatoes in, over the skillet. This will help hold the potato slices together as they cook. Heat the skillet over medium high heat on the stove top for about 10 minutes. Do not allow the potatoes to burn but you should see a good crispy crust.

Preheat oven to 400 degrees. After 10 minutes, check the potatoes by removing the heavy pot and carefully lifting the aluminum foil along one side to get a peek. If you do not see a crust forming, place the aluminum foil back over the skillet, the heavy pot back on top, and continue cooking on the stove another 2-4 minutes, increasing heat slightly if necessary.

Remove the skillet (with the heavy pot) to the preheated oven and roast another 30 minutes. Remove heavy pot and aluminum foil and roast uncovered an additional 8-10 minutes. Remove from oven, run a knife around the edge and invert onto a warm serving platter. Serves 6-8.

I like to top mine with a dollop of light sour cream, plain yogurt, or crème fraîche (for you Francophiles out there).

Goodness knows… its Challah Bread

Challah bread

Today’s recipe is my family’s favorite bread, nudging out 1,2,3 Bread by a slice. I first came across Challah bread many years ago at Signe’s Bakery & Café on Hilton Head Island, SC. Signe Gardo makes many fine breads including a fantastic 8-Grain and during the holidays, a spectacular traditional Stollen with real marzipan – one of my other favorites! She is a veritable institution (36 years plus!) of breakfast and lunch deliciousness, so if you’re ever on Hilton Head Island, I highly recommend a stop here.

Challah is a rich, egg bread eaten on the Jewish Sabbath and Holidays. While I am not Jewish, I love to eat and make Challah bread. It is a fun bread to make with kids as the resulting loaf is pretty impressive (especially if you take the time to create the 4-braid loaf) and tastes great. Girly Girl could not stop eating this loaf, exclaiming, “Mommy it tastes even better today than it did yesterday!” Challah is wonderful plain, warm from the oven, apparently excellent the “next day”, and makes great French toast and bread pudding…it there’s any left for those purposes!

One can make the Challah with vegetable oil to remain Kosher, or as I did use Ghee. I’ve made the recipe both ways, this last time trying out the Ghee, which was given to me by my friend Greta over at the Herban Marketplace. Ghee is a clarified butter that is commonly used in south Asian cooking, has an amazingly long shelf life and requires no refrigeration. Ghee is a real epiphany if you enjoy the nutty richness of clarified butter and can buy an organic brand.

Replacing the vegetable oil in Challah actually makes the bread non-Kosher like I stated above, and this switcharoo means the Challah is now actually Brioche, for all intents and purposes. For any Francophiles out there; Yes, you can bake this dough in a fluted and flared tin and place a small ball of dough on top and voilà, you have classic Brioche à tête.

So today you’re getting a sort of a two-fer recipe. Hey, I’m all about value!

First thing make your starter - flour, yeast and water. So simple!

First thing make your starter – flour, yeast and water. So simple!

Allow the starter to rest - have a cup of coffee - the starter will be sort of gummy and thick. This means that the yeast is doing it's thing.

Allow the starter to rest – have a cup of coffee – the starter will be sort of gummy and thick. This means that the yeast is doing it’s thing.

Here are the other ingredients, including the Ghee.

Here are the other ingredients, including the Ghee.

Mix the eggs with the starter and the Ghee - all the 'wet' ingredients. You can use a mixer with a dough hook attachment or mix by hand.

Mix the eggs with the starter and the Ghee – all the ‘wet’ ingredients. You can use a mixer with a dough hook attachment or mix by hand.

Add in the dry ingredients. The KitchenAid mixer makes quick work of it. Mix it together well and then knead for a couple of minutes by hand if you like.

Add in the dry ingredients. The KitchenAid mixer makes quick work of it. Mix it together well and then knead for a couple of minutes by hand if you like.

This dough is a pleasure to work with if you enjoy kneading dough by hand. I think it is somewhat theraputic myself.

This dough is a pleasure to work with if you enjoy kneading dough by hand. I think it is somewhat theraputic myself.

Place the dough in an oiled bowl and allow to sit in a warm place to rise. Here is the 'before' picture.

Place the dough in an oiled bowl and allow to sit in a warm place to rise. Here is the ‘before’ picture.

Here is the dough after the rise.

Here is the dough after the rise.

Punch the dough down, separate into 4 evenly sized balls and then roll out into 4 evenly sized strands.

Punch the dough down, separate into 4 evenly sized balls and then roll out into 4 evenly sized strands.

Pinch the ends together to start.

Pinch the ends together to start.

Begin braiding the bread according to the instructions below.

Begin braiding the bread according to the instructions below.

The braided loaf ready for the glaze.

The braided loaf ready for the glaze.

Brush on the glaze and allow to rise again for about an hour.

Brush on the glaze and allow to rise again for about an hour.

Preheat your oven, brush more glaze on the risen bread and sprinkle with poppy seeds, if you like.

Preheat your oven, brush more glaze on the risen bread and sprinkle with poppy seeds, if you like.

Challah bread sliced

Bake the loaf in the preheated oven and remove to cool on a rack. Slice with a serrated knife or just pull apart. This bread is truly heavenly!

Challah Bread (or Brioche if using the Ghee)

Based on a recipe from King Arthur Flour

Quick Starter

  • 1 cup unbleached all-purpose flour
  • 1 cup water
  • 2 teaspoons instant yeast 

(basically 1 pkg of yeast)

Dough

  • All of the starter
  • 3 1/2 cups unbleached all-purpose flour
  • 1 3/4 tsp salt
  • 1/3 cup sugar
  • 1/4 cup Ghee (or vegetable oil to remain Kosher)
  • 2 large eggs + 1 yolk (save 1 egg white for the wash, below)
  •  
  • Wash
  • 1 egg white
1 teaspoon sugar
  • 1 tbl water
  • poppy seeds (optional)

Make the starter by mixing 1 cup flour, 1 cup water and yeast together in a large bowl. Let the mixture sit for about 45 minutes.

Add the dough ingredients to the starter and mix and knead together — by hand, or with a mixer– until a smooth, supple dough is formed. I knead mine about 3 minutes after it has come together. Place the dough in a greased bowl, turning it over once to coat it lightly with oil. Cover it and let it rise for about 60 minutes, or until it’s doubled in size.

Punch down the dough. Divide the dough into four pieces, and roll each into a snake about 18 inches long. On the lightly greased or parchment-lined sheet pan, braid a four-strand braid (see instructions below) or fashion a simpler three-strand braid.

NOTE: How To Make A Four-Strand Braid: Lay the strands side by side, and pinch them together at one end. For instruction purposes, think of the far left strand as #1, next is #2, then #3, and the far right is #4. Take the left-hand strand (#1) and move it to the right over strands #2 and #3, then tuck it back under strand #3. Take the right-hand strand (#4) and move it to the left over strands #3 and #1, then tuck it back under strand #1. Repeat this process until finished.

Make the wash by mixing together, in a small bowl, the reserved egg white, sugar, and water. Brush the loaf with this mixture, reserving some for a second wash. Cover the loaf with lightly greased plastic wrap and allow it to rise for 45 minutes to 1 hour, or until it’s almost doubled in size.

Brush the loaf with the remaining egg wash (this will give the finished loaf a beautiful, shiny crust, as well as provide “glue” for the seeds), sprinkle with poppy seeds, if desired, and bake in a preheated 375°F oven for 35 to 40 minutes, or until the Challah is lightly browned. Remove it from the oven, and cool completely before slicing.

Yield: 1 large loaf, about (16) 1-inch slices.

Ramblings: Don’t fear the pluff mud, it’s the least of your worries!

Triumph!

Triumph!

Over the weekend I was a witness to a spectacle of human fortitude, sportsmanship and an incredible amount of mud. It was the inaugural Face Your Fears mud run, held in the neighboring town of Bluffton, SC.

Apparently mud runs are becoming quite popular, a thrilling step up from the run-of-the-mill 5k or 10k races that occur with regularity here in the Lowcountry (and probably everywhere else in the US). Our area, i.e. the ‘low-country’ is well, low and muddy, so it’s the perfect locale for this kind of adventure race.

This is pluff mud. Stepping into it you could sink a mere 6 or 7 inches... or 3 or 4 feet!

This is pluff mud. Stepping into it you could sink a mere 6 or 7 inches… or 3 or 4 feet!

We even have different kinds of mud here – sandy mud, red clay mud, and our own indigenous “pluff” mud. Pluff mud is the bees knees of mud. It is heavy yet fluffy with a sticky viscosity that will suck the Keds right off your feet. Pluff mud is found in the salt marshes – it’s the rich, organic matter formed from decaying plants, sea creatures and every other critter that’s ever lived (and died) in the estuary. Pluff mud has it’s own distinct aroma too – as native son Pat Conroy says, “I don’t know of any place that smells like this. It’s a magnificent smell. It’s the smell of where all life comes from. I love that all shrimp, all crab, all oysters are born in the marsh.”

When I was young I didn’t care for that smell myself, but as I grew older pluff mud forever linked my brain with the coast. Its smell became sweeter and instantaneously recognizable as soon as it hit my olfactory cortex. To me that smell equals “home.”

Now, back to the race. So although our area was fashioned perfectly for a “mud run”, lo and behold if it seems that even a mud run has become passé – enter the “fear” part of the equation. Rumors were running rampant prior to the race, regarding the obstacles being added to induce ‘fear’. I heard there may be some electric shock(s) and perhaps live animals. While I discounted electric shock figuring the liability cost would be prohibitive, I thought, “hey, live animals could occur even if the event producers didn’t plan any.” Alligators, poisonous snakes (eastern diamondback, cane brake rattle snakes and water moccasin are common here) and leaches and eels are indigenous in our rural (and not so rural) landscape.

After wading through a muddy pool of frigid water it's up a 20-foot "mountain".

After wading through a muddy pool of frigid water it’s up a 20-foot “mountain”.

Luckily our temperatures have been quite cool over the past couple of weeks, consequently the likelihood of any reptiles lurking out and about on a cold morning was low. So here trudged our group (Girly Girl and I were the support staff) into the rainy, cold morning at Palmetto Bluff Resort. Now Palmetto Bluff has been named one the top resorts in the U.S. (2012 Conde Nast) and it IS quite impressive with an atmosphere replete with Southern nuances and an extremely accommodating staff. But the Face Your Fears mud run was on the OTHER side of the resort – the decidedly “natural” side. Other than a few dirt roads weaving throughout, several shorn acres of corn and an irrigation pond or two this part of Palmetto Bluff looks the same as it did 20 years ago, probably the same as it did 100 years ago.

As the race grew closer the rain drizzled on and off and the mud got muddier. Perfect. When it was all said and done my sis and Dear Hubby made it through and received their ‘dog tags’. Obstacles included a 20-foot high dirt ‘mountain’ climb, a vat of ice, an army-style crawl under barbed wire, straw bail jumping akin to a Mario-brothers game, and lots and lots of mucky pluff mud! No gators or snakes were reported to have joined in the fun. Almost as soon as they were through the finish line, Dear Hubby told me he was ready to take on

After the climb and sliding down the other side, run a hundred yards where a huge vat of ice water awaits.

After the climb and sliding down the other side, run a hundred yards where a huge vat of ice water awaits.

more ‘fear” next year, while my sis may chalk this up to the bucket list… one and done!

About the Face Your Fears Mud Run: Face Your Fears is the creation of Thomas Viljac of Bluffton, SC. Challenge yourself to face your fears both physically and mentally!

The course options included:

Course “B” (the Courage Course) with 3 miles and 16 obstacles and Course “A” (the Valor Course) with 10 miles and 25 obstacles, not including 2 mystery obstacles, the “Game Changers”.

The Face Your Fears Foundation supports four charities. All proceeds are equally distributed to The MARSOC Foundation, US Navy SEAL Foundation, Lone Survivor Foundation, and Brothers In Arms Foundation (SOCOMM).

The last obstacle was a jump into one of the lagoons. At least most of the mud gets washed off...

The last obstacle was a jump into one of the lagoons. At least most of the mud gets washed off…

Dear Hubby helping my sis out of the pond. Ever the gentleman!

Dear Hubby helping my sis out of the pond. Ever the gentleman!

They made it! No snake run-ins, leech entanglements or broken limbs. Just lots of shivering and some muddy clothes to wash.

They made it! No snake run-ins, leech entanglements or broken limbs. Just lots of shivering and some muddy clothes to wash.